The Daily Routes panel lists all routes for the selected day, and includes options for adding, editing and deleting routes. It also includes a search tool to filter routes based on their name, or the driver's name, and tools to manipulate which routes should be rendered on the map, and how.
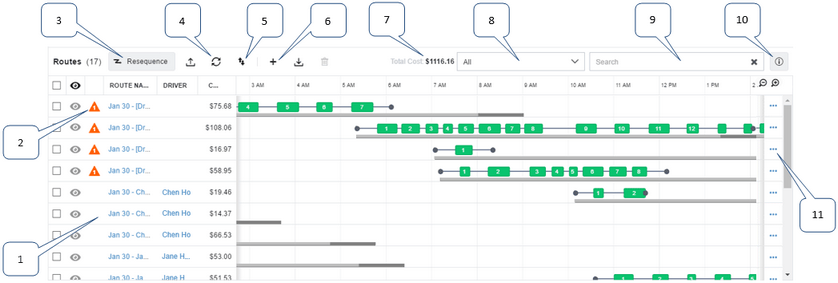
| 1. | Routes List - Lists all routes for the day selected using the Date Selector at the top of the Jobs List panel. These routes can be in the future, on the current day, or on any of the previous seven days in each territory you have configured. Each row contains one route, graphically displayed as a timeline containing icons positioned to illustrate the scheduled time of each job in the route, the relative length spent on site for each job, the interval between jobs, and the order of jobs in the route. Jobs are represented by green squares (or red squares, if a warning violation is been generated for the job) above a gray bar representing the route. The gray route bar and the green job icons are positioned relative to the time of day, as represented by the hourly intervals that stretch across at the top row of the list.
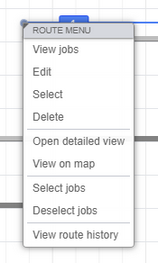
The Route column to the left of the routes list shows the name of each route. Click the Highlight button ( ) beside a route's name to draw the route on the map. This also zooms and pans the map to the route location. Click the Show All Routes button () at the top of the column to draw all routes in the list on the map or, if there are routes already highlighted on the map, hide them all. The Driver column shows the driver the route is assigned to; the Jobs column shows the total number of jobs in the route, and the Vehicle column shows the name of the vehicle that is set to drive the route. The total number of violations or warnings for a route, if any, is shown beneath the Warnings column ( ) beside a route's name to draw the route on the map. This also zooms and pans the map to the route location. Click the Show All Routes button () at the top of the column to draw all routes in the list on the map or, if there are routes already highlighted on the map, hide them all. The Driver column shows the driver the route is assigned to; the Jobs column shows the total number of jobs in the route, and the Vehicle column shows the name of the vehicle that is set to drive the route. The total number of violations or warnings for a route, if any, is shown beneath the Warnings column ( ). Click this highlighted number will open the violation details window, which contains full details of the problem. Use the Zoom In ( ). Click this highlighted number will open the violation details window, which contains full details of the problem. Use the Zoom In ( ) and Zoom Out ( ) and Zoom Out (  ) buttons or your mouse scroll-wheel to increase or reduce the size of the routes in the timeline, or double-click a row to view that route in more detail in the Route Timeline (only a single click is needed if the timeline is already open). Click the highlighted route name to open the route editor panel, or right-click within a row to open a contextual menu: ) buttons or your mouse scroll-wheel to increase or reduce the size of the routes in the timeline, or double-click a row to view that route in more detail in the Route Timeline (only a single click is needed if the timeline is already open). Click the highlighted route name to open the route editor panel, or right-click within a row to open a contextual menu:
The Routes List Contextual Menu
|
| 2. | Violations - This column displays the total number route violations, if any, caused by adjustments made to jobs or routes. Click the number beside the route in this column to open a dialog box containing full details of the violations for that route. |
| 3. | Re-Sequence - This button is used to recalculate the route along the roadways between each job, and the order and timing of jobs within routes. When a route is changed, for example if new jobs are added or existing jobs are removed from it, the route will be re-calculated automatically. The Re-Sequence button adjusts the position of jobs within the selected routes, if needed. To the left of this button, the number of routes currently selected on the Routes List is shown in brackets. In the example above, this number is 17. |
| 4. | Re-Evaluate - This button is used to recalculate route cost, distance, driving times and violations for all routes visible in the Routes List. This feature is helpful if you have made changes to your route settings. Use this option when you only want updated values, and don't want to re-sequence existing routes, which might result in re-ordering of the jobs in your existing routes. |
| 5. | Reverse Routes - This button is used to reverse the order of jobs within the selected routes. Only jobs within routes with a status of 'Not Started' or 'In Progress' can be reversed, and only the jobs within the route are reversed: the start and end depot locations specified in the original route are retained. If the route is already in progress, the order of any completed jobs is not changed, only those that have not yet started, jobs that were missed, and any jobs with a status of 'En Route'. Jobs scheduled to be completed but not, and therefore marked as missed, might also be moved to a future time within the route and therefore no longer marked as missed. When the order of jobs in a route is reversed, the cost of the route is automatically recalculated. |
| 6. | Add and Remove Buttons - The Add ( ) and Remove ( ) and Remove ( ) buttons are used to add a new route to the list, or to delete routes in the list that have a checkbox selected beside them. ) buttons are used to add a new route to the list, or to delete routes in the list that have a checkbox selected beside them. |
| 7. | Total Cost - Displays the estimated total cost of all routes displayed on the Daily Routes panel. The cost of individual routes is based on route distance, vehicle fuel costs, average fuel consumption, shift length and driver pay rates. The total cost is calculated by adding the cost of each individual route currently visible on the panel together. |
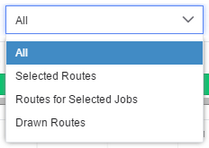
| 8. | Filter Control - Filters the Routes List to include only routes that have been selected, or only routes containing selected jobs, or only routes that are currently showing on the map. That is, routes in the Routes List that have a checkbox beside them selected, or routes containing jobs that have a checkbox beside them selected on the Jobs List . To draw these routes on the map, click the Highlight button () beside the route's name, or right-click within a row and select the Draw route option from the menu that opens. If no routes or jobs are selected, and no routes are currently drawn on the map, the routes list is cleared of all routes.
|
| 9. | Search Control - This control filters all routes in the list using route and driver names. To search for a specific route name, or for routes assigned to a driver, type a name into the Search control. As you begin to type, the list is filtered by letter, and then word. Click the Clear ( ) button at the right edge of the field to clear the current search string. ) button at the right edge of the field to clear the current search string. |
| 10. | Show Detailed Route - Click the Information ( ) button to open the Route Timeline detailed view. If no route has been selected from the Routes List, this view displays the first route listed. ) button to open the Route Timeline detailed view. If no route has been selected from the Routes List, this view displays the first route listed. |
|

 Previous
 Next
Next Expand/Collapse
 Print
Print Share Page
 Training
 Knowledge


 ) shows all available panels: the
  ) hides the
  ) hides the
  ) shows only the
 ) shows only the


