The Dispatch Preferences dialog box includes options that control:
•
Whether or not you are asked to approve the assignment of jobs to routes (when requesting an automatic assignment).
•
Whether you are shown the results when a job is added to a route (whether it is successful or not, and, if it is, the details of the route and driver). This includes both automatic and manual job insertions.
•
Whether or not the Route Timeline detailed view is open by default when starting Dispatch.
•
Whether the current checkbox selection is automatically cleared once a task on the selected items starts.
•
Whether the selection filter returns to the 'All' setting when no routes or jobs are selected in the grid and the filter tool is being used.
•
Whether clicking a job in the Jobs List opens the Edit Job dialog box, or the Job Overview dialog box.
To specify how these options are configured:
1.
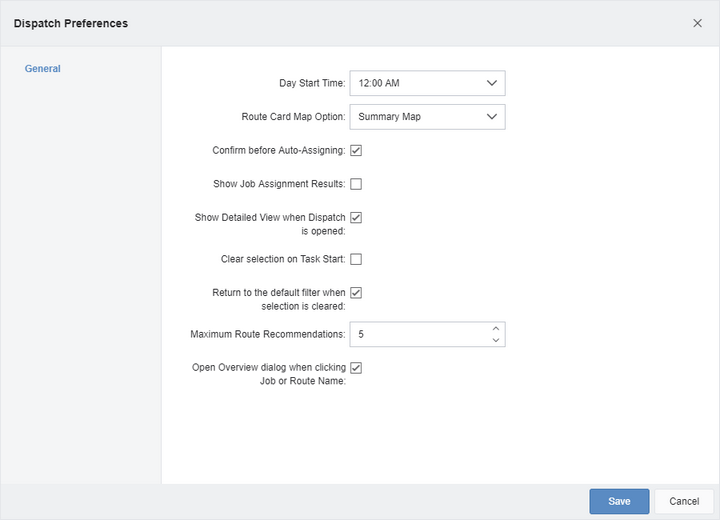
Click the Dispatch Preferences button () in the upper right corner of the screen. The Dispatch Preferences dialog box opens.
o
Open the Day Start Time drop-down to specify the time of day that a logical day starts.
o
Open the Route Card Map Option drop-down box to specify whether a map is included on any route cards generated, and what type of map that will be shown if included (either a single summary map showing all jobs, or maps for each individual job on the route).
o
Select the Confirm before Auto-Assigning checkbox option if you want to be asked to confirm an auto-assignment of a job or jobs to a route. If this box is selected, you are presented with a message dialog box every time you request a job assignment, and must accept (Yes) or reject (No) the request before the action is performed. This option can prevent accidental job assignments.
o
Select the Show Job Assignment Results checkbox to tell Dispatch to open a results dialog box every time more than one job is added to a route, even if the task completes successfully without any warnings or violations. If jobs are inserted into a single route, the dialog box message is not displayed, and the route the jobs are assigned to is selected. This option is enabled by default.
Select the "Don't show this dialog again" checkbox on the Assign Job or Assign to Route dialog boxes to clear their respective option checkbox on the Dispatch Preferences dialog box.
o
Select the Show Detailed View when Dispatch is opened checkbox to display the Route Timeline detailed view as soon as Dispatch is opened, or leave it clear to hide the timeline until a route has been selected.
o
Select the Clear selection on Task Start checkbox to clear your checkbox selection in the Jobs List or the Daily Routes panel as soon as a task is performed on that selection; for example when automatically assigning several jobs to routes from the Jobs List, or when re-sequencing a selection of routes on the Daily Routes List. The checkbox selection will be cleared regardless of the status of the action, including failure or error. If you select both jobs and routes, and perform a task that affects only the jobs or the routes in your selection, the selection that is not affected by the action is not cleared (for example, select two jobs from the Jobs List and two routes from the Daily Routes panel, and then click the Optimize button on the Daily Routes panel. The route selection is cleared, but the jobs remain selected).you have selected a route.
o
Select the Return to the default filter when selection is cleared checkbox to return the job and route filter selection tools to 'All' once the current selection has been cleared. When not checked, the filter selection might cause no items to be shown in the grid (for example, if you choose 'Selected Jobs' and do not have any jobs selected in the grid).
o
Enter a value between 1 and 20 into the Maximum Route Recommendations field. This is the maximum number of routes that the optimizer will suggest as suitable when you ask it to recommend alternative routes to service your jobs. This option is only available if your subscription includes Verizon Connect® Response™.
o
Select the Open the Job Overview when clicking on a Job's name checkbox to display the Job Overview when a job name is clicked on the Jobs List, or leave it clear to open the Edit Job dialog box when a job is clicked. In either case, the Job Overview dialog box can also be opened by right-clicking a job and selecting View details from the contextual menu that opens.
2.
Click the Save button to save your changes, or click the Cancel button to close without making any changes.
 ) in the upper right corner of the screen. The Dispatch Preferences dialog box opens.
 Previous
 Next
Next Expand/Collapse
 Print
Print Share Page
 Training
 Knowledge

