The Verizon Connect Share feature allows businesses to share a real-time view of their service vehicles with third parties. This ability is particularly useful for emergency or disaster response services, allowing utilities to track the location and progress of their contracted service providers, promoting better coordination of their activities with one another.
Imagine a lines company responsible for repairing damaged utilities following a major storm. In heavily-wooded areas, this task could only begin once all fallen trees had been removed from fallen transmission lines. Verizon Connect Share could allow a tree removal company to share the location of their vehicles with the lines repair company, resulting in better coordination and faster, more efficient completion of repairs.
Third parties given access to the location of a fleet or specific vehicles - called "claiming" a share - might or might not have platform accounts of their own, and the level of detail shown is fully configurable, ensuring that only the information they require is provided. Their view can also be set to read-only, if needed. Once the collaborative work has been completed, the sharing service can be turned off as quickly as it was created.
Once a share has been claimed by a sharing customer, it cannot be shared with additional third parties.
With Verizon Connect Share you can share fleets using either:
•
The Share with Customer option, which shares specified fleets or vehicles, or both, to another platform account. This option requires that the sharing customer has their own platform account, and that they "claim" the share by configuring their own account with a unique 32-character key that identifies the shared fleet; or
•
The Share with User option, which creates a new subuser account under the main customer account. This option simplifies pre-existing sharing features within the platform, and therefore does not require any additional configuration (such as configuring a fleet with a 32-character sharing key).
When sharing with another fleet customer (Share with Customer), that account is given limited administrative member and item rights over any shared vehicles (that is, they can add, remove, and view vehicle details; rename or delete the shared fleet; view diagnostic details and location information; generate reports on shared vehicles). They do not have access to information about vehicles' drivers. When a fleet or vehicle is shared with a subuser (Share with User), the subuser's access to information is governed by their item and member rights, standard subuser rights, and private and role rights.
1:
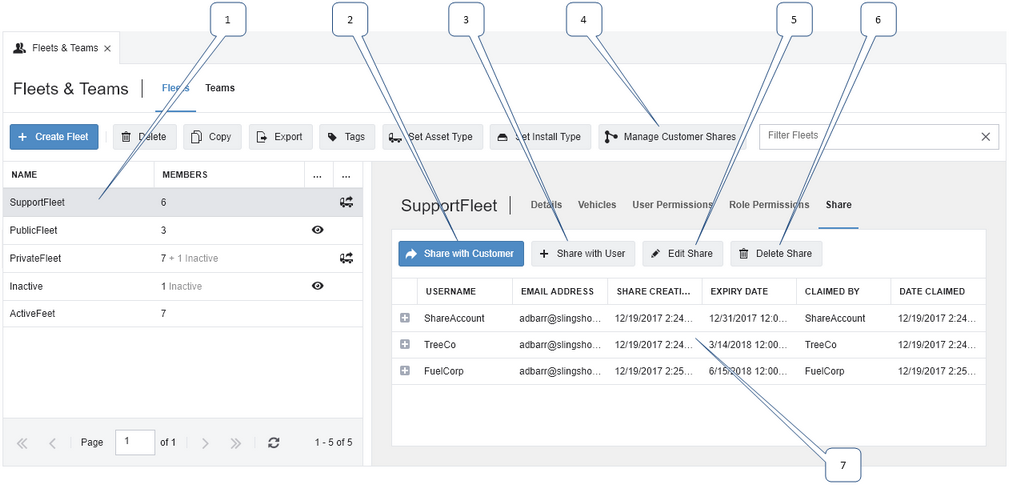
The Fleets list. Click a fleet or team to select it. If the list is long, click the Previous and Next arrows to move between pages, or use the filter field in the upper right corner. The Members column indicates the number of vehicles within the fleet. Fleets that have been shared display the share icon in the Share column.
The Shares list contains details of the current customer shares (as opposed to subuser shares) created for the selected fleet. Click the toggle button to the left of the username to view the unique 32-character sharing key associated with the customer share.
•
Username – the username associated with this share.
•
Email Address – the email address to which a unique sharing key and instructions on claiming a share were sent.
•
Share Creation – the date and time this share was created.
•
Expiry Date – the date the share ceases to function. After this date the customer can no longer view the shared fleet in their platform account.
•
Claimed By - the customer account used to claim (activate) this share.
•
Date Claimed - the time and date this share was claimed by a customer account.
To share a fleet with customers that have their own platform accounts:
1:
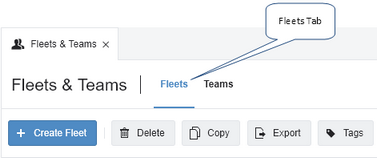
From the Main section of the navigation bar choose Fleets & Teams.
2:
Click the Fleets tab on the left of the screen, then select the fleet you want to share from the list. To share only a specific set of vehicles, create a new fleet that contains only these vehicles.
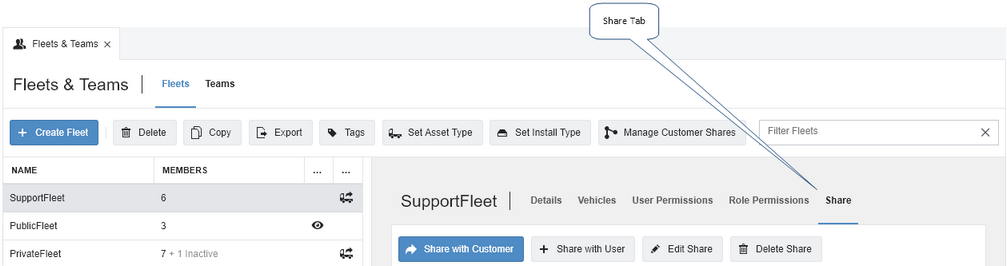
3:
On the right side of the screen, click the Share tab.
4:
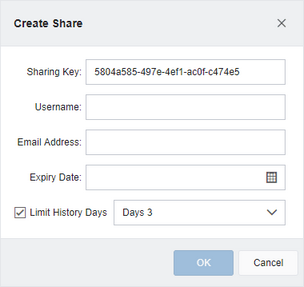
Click the Share with Customer button above the Shares list. The Create Share dialog box opens.
5:
Type a username into the Username field. This is the username associated with this share, that contains fewer than 20 characters.
6:
Type the share user's email address into the Email Address field. This is the address that a welcome email containing instructions on claiming a share is sent to.
7:
Click the calendar icon at the right edge of the Expiry Date field and select a date from the calendar widget. Alternatively, type a date into the text field. After this date the sharing key is no longer granted access to the shared fleet.
The expiration date of the sharing key can be easily edited after the share has been created.
8:
Select the Limit History Days check box if you want to limit the number of vehicle history days that the share user can see, then select a value between 3 days and 90 days from the History Days drop-down list.
9:
Click OK. The new share is shown in the Shares list.
To share a fleet with a customer who does not have their own platform account, and therefore requires a new subuser account under the current main account:
1:
Open the Fleets & Teams screen from the Main menu section.
2:
Select the Fleets tab on the left of the screen, then select the fleet you want to share. To share only a specific set of vehicles, create a new fleet that contains only these vehicles.
3:
On the right side of the screen, click the Share tab.
4:
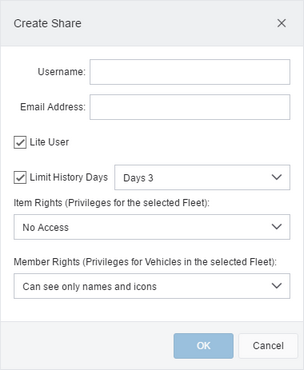
Click the Share with User button above the Shares list. The Create Share dialog box opens.
5:
Type a username into the Username field. This is the username associated with this share, and the username that the share customer signs into the system with. This name must contain fewer than 20 characters.
6:
Type the share user's email address into the Email Address field. This is the email address to which the platform welcome email is sent.
7:
Select the Lite User check box if you want to user to have only lite user permissions. Lite users can only see the Home screen, the Map, and the Vehicles list.
8:
Select the Limit History Days check box if you want to limit the number of vehicle history days that the share user can see, then select a value between 3 days and 90 days from the drop-down list.
9:
Click the Items Rights field to open the rights menu, then select the rights that you want assigned to the new share account:
o
No Access. This share account cannot change the vehicles they have permission to view in any way. This is the default option.
o
Can add and remove Vehicles from the Fleet. This share can only add or remove vehicles from the shared fleet.
o
Can add and remove Vehicles from the Fleet and rename it. This account can rename the shared fleet, and add or remove vehicles within it.
o
Can add and remove Vehicles from the Fleet and rename and delete it. This account can rename or delete the shared fleet, and add or remove vehicles within it.
10:
Click the Member Rights field to open the rights menu, then select the membership rights given to the new share account:
o
No Access. This share account cannot view vehicles in the shared fleet.
o
Can see only names and icons. This share account can see only vehicle names and their location on the map as icons. This is the default option.
o
Can see all details. This share account can see all vehicle details (location, speed, driver, tags).
o
Can see and edit all details. This share account can see all vehicle details, and change these details.
The Item Rights and Member Rights options available on this dialog box duplicate the settings available from the User Permissions tab of the Fleets & Teams screen.
11:
Click OK. The new share account is not shown in the Shares list. Instead, a new subuser account is created and can be managed from the Subusers screen. The new subuser is sent an email asking them to choose a password to complete their account setup. This option does not include an expiration date, therefore the subuser account must be manually edited, disabled or deleted if you want to cease sharing.
If your account includes the User Application Access system, ensure that the Fleet Access check box is selected on the subuser's Rights tab, or that the subuser has been assigned to a role with this right. Without this right enabled, the subuser cannot sign in.
To edit the rights you selected on the Create Share dialog box, select the fleet from the left window, then click the User Permissions tab and specify a new set of Item and Member rights for an individual user.
Open the Fleets & Teams screen from the Main menu section.
2:
Select a share customer from the Shares list to the right then click the Delete Share button. The sharing account is permanently deleted. To place the account on hold rather than delete it, see Adding and Removing Shares.
Adding and Removing Shares From a Fleet
To temporarily shelve one or more shares from a fleet, or reinstate a disabled share:
1:
Open the Fleets & Teams screen from the Main menu section.
2:
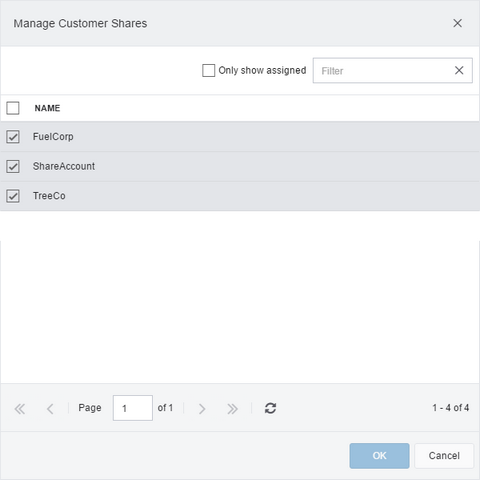
Select a shared fleet from the left Fleets tab, then click the Manage Customer Shares button. The Manage Customer Shares dialog box opens.
3:
From the Manage Customer Shares dialog box, clear the check box beside any accounts you want to stop sharing to, or select the check box beside any accounts you want to re-enable.
4:
Click OK. Disabled shares are removed from the right Customer Shares list. These shares are not deleted and continue to be listed when the Manage Customer Shares dialog box is opened again in future, as long as the share has not been permanently deleted.
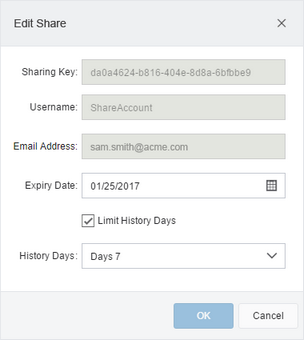
Editing Sharing Key Expiration Date
To edit the expiration date of a sharing key:
1:
From the Main section of the navigation bar choose Fleets & Teams.
2:
Select a shared fleet from the left Fleets tab. The right window populates with users who have been given sharing permissions to this fleet.
3:
Select an account from the right Shares window.
4:
Click the Edit Share button. The Edit Share dialog box opens.
5:
Click the calendar icon at the right edge of the Expiry Date field and select a new date from the calendar widget. Alternatively, type a date into the text field. After this date the sharing key no longer permits access to the shared fleet.
6:
Click Save. The expiration date of the sharing key is now updated.
 Previous
 Next
Next Expand/Collapse
 Print
Print Share Page
 Training
 Knowledge

 to the left of the username to view the unique