Markers List
|
You might see either the current Markers screen, as described below, or the legacy Map Markers screen depending on your account configuration. |
The markers list on the Markers screen lets you see all the markers defined for your account. From the Main section of the navigation bar choose Markers to open the Markers screen.

The Markers screen consists of the following three panels:
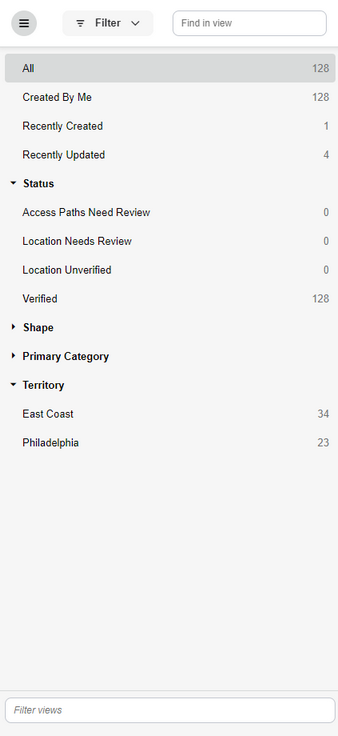
| • | Views - A list of pre-defined views, which you can use to narrow down the markers list. For example, you could use views to see all markers with a polygon shape or all markers in a particular territory. |
| • | Markers List - A list of markers with some basic information, including the address, territory, and edit date. To narrow down this list, select a view or define your own filters. |
| • | Marker Details - Information about the marker that you have selected in the marker list. |
You can use the List ![]() icon to show or hide the Views panel and the Detail
icon to show or hide the Views panel and the Detail ![]() icon to show or hide the Marker Details panel. Drag the sides of the panels to resize the adjacent panels.
icon to show or hide the Marker Details panel. Drag the sides of the panels to resize the adjacent panels.
From the Markers screen you can perform the following tasks:
| • | Filter the markers list to view a smaller subset of markers. |
| • | View and edit some of the details about a selected marker. |
The center panel of the Markers screen shows a markers list:
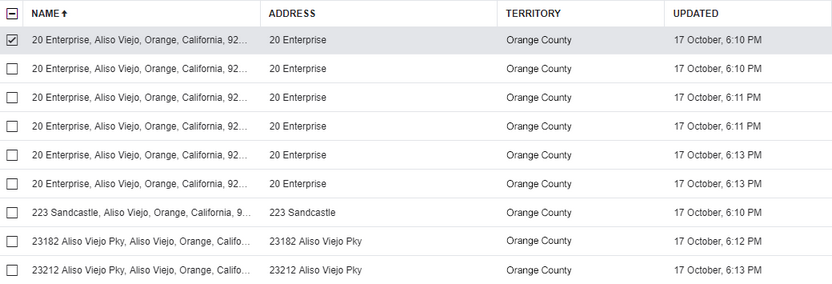
The markers list can display the following columns:
| • | ID - A unique identification number that the marker gets automatically, when created. |
| • | Name - The name of the marker. |
| • | Primary Category - The primary category that this marker is assigned to. The categories are defined on the Marker Categories screen. You can set the primary category under Actions. |
| • | Address - The physical street address of the marker. |
| • | City - The city that the marker is in. |
| • | State - The state that the marker is in. |
| • | Zip Code - The ZIP code that the marker is in. |
| • | Latitude - The latitude coordinate where the marker is located. |
| • | Longitude - The longitude coordinate where the marker is located. |
| • | Shape - The shape of the marker: "Circle" or "Polygon". |
| • | Radius - The radius of the marker's area, if the marker's shape is a circle. |
| • | Secondary Categories - The secondary categories that this marker is assigned to. The categories are defined on the Marker Categories screen. You can set the secondary categories under Actions. |
| • | Tags - The tags that are associated with this marker. The tags are defined on the Tags screen's Markers tab. You can add tags under Actions. |
| • | Stop Id - (Applicable if you have Verizon Connect® Response™) A unique identifier that can be used as stops for jobs and routes. |
| • | Territory - (Applicable if you have Verizon Connect® Response™) The territory that the marker is in. You can define territories on the Territories screen under Jobs & Routes. |
| • | Created - The date and time when the marker was first created. |
| • | Created By - The username of the user who created the marker. |
| • | Updated - The date and time when the marker was last updated. |
| • | Updated By - The username of the user who last updated the marker's details. |
To sort data by column, click the down arrow to the right of the column and select Sort ascending or Sort descending. Not all columns can be sorted.
To show or hide a column, click the down arrow to the right of the column, select Columns, and either select or clear the check box next to the column name.

To view a smaller subset of markers, you can either use the filter in the upper left corner or one of the pre-defined views from the list in the left panel.
Using Views
To use a pre-defined view, select one of the views in the left panel.
The number next to the view name shows how many markers are in the view.
When you select a view, click the Filter button to see the filters that are applied. You can add more filters to narrow down the markers list further.
To easily find a view, start typing its name into the Filter views field in the lower part of the screen.
Using the Filter
You can apply one or more filters to narrow down the list of markers. Click Filter to open the filter pop-up.
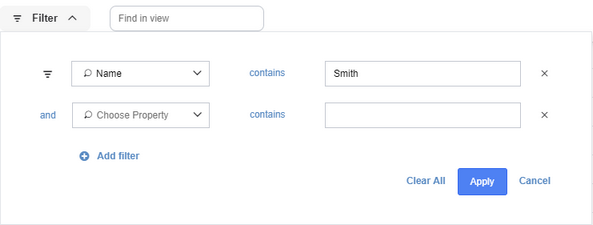
Each filter consists of the following elements:
| • | Property - Select a property from the list, for example "Name" |
| • | Operator - Click the current operator, for example "contains", and select a different operator if required. |
| • | Value - Enter text or a number into the text field, for example "Smith" for the name property. |
To add a new filter, click Add filter.
To remove a single filter, click the x beside the filter. To remove all filters, click Clear All.
If you have more than one filter, an "and" displays between the filters. The "and" means that all filters must apply, for markers to show in the markers list. If you want to show the markers for one or more of the filters, change the "and" to an "or". To do this, click the "and" and change it to an "or". You can change only the first "and" or "or", because "and" and "or" operators must match within a filter.
Viewing and Editing Marker Details
Select a marker from the center panel to view the marker's details in the right panel.

The details panel contains the following information:
Field or Link |
Purpose |
|---|---|
View or edit on map |
Click this link to see the marker on the Map screen. From here you can see your vehicles and other information, and you can edit marker details that you cannot edit from the Markers screen. Some of the details that you can edit only on the Map screen include location, yard shape, and access paths. |
Primary Category |
The primary category that this marker is in. The categories are defined on the Marker Categories screen. You can set the primary category under Actions. |
Territory |
(Applicable if you have Verizon Connect® Response™.) The territory that the marker is in. You can define territories on the Territories screen. |
Shape |
The marker's shape, either "Circle" or "Polygon". The default shape is "Circle". Polygon shapes are usually more accurate, because someone has redrawn the shape manually. |
Radius |
The radius of the marker's shape, if the shape is a circle. |
Attributes |
You can display attributes here that you create on the Marker Admin screen and then add to the marker on the Mini-map tab of the Marker Details pop-up. |
Addresses |
The first address in this section is the address at the location where the marker was created. You can add more addresses to this marker and define an address type, such as "Physical", "Postal" and "Alternate". |
Contacts |
The contact details for this marker. A contact consists of a type, name and phone number. You can add more than one contact. |
Tags |
One or more marker tags that you can create on the Markers tab of the Tags screen. |
Description |
A description of the marker. This description is displayed on the Mini-map tab of the Marker Details pop-up, available from the Map screen. |
Notes |
Informal notes about the marker. |
Information |
Details about who created the marker, when, where, and how. |
To make changes to the details, click the More ![]() icon in the upper right corner of the details panel and then select Edit Marker, or, alternatively, click the Edit icon
icon in the upper right corner of the details panel and then select Edit Marker, or, alternatively, click the Edit icon  next to the section that you want to update. The Edit dialog box opens. You can edit the Notes section in line.
To select multiple markers in the list, you can choose one of the following methods:
| • | To select specific markers, select the check boxes next to the markers in the list. |
| • | To select specific markers, click one marker, hold down the Ctrl key and click the other markers. |
| • | To select a range of markers, click the first marker in the range, hold down the Shift key and click the last marker in the range. |
| • | To select all markers, select the check box in the upper left corner of the markers list. |
To delete one or more markers follow these steps:
| 1. | Select the markers you want to delete. |
| 2. | Click Delete in the upper right corner of the screen. |
To export one or more markers follow these steps:
| 1. | Select the markers you want to export. |
| 2. | Click Export in the upper right corner of the screen. |
| 3. | On the dialog box, select the marker information to include in the exported file. |
| 4. | Click OK. |
Setting the Primary Category for One or More Markers
To set the primary category for one or more markers follow these steps:
| 1. | Select the markers for which you want to set the primary category. |
| 2. | Click Actions and select Set Primary Category from the drop-down list. |
| 3. | Select a category from the list. The categories are defined on the Marker Categories screen. |
| 4. | Click Save. |
You can set one primary category and several secondary categories.
Setting the Territory for One or More Markers (Applicable If You Have Verizon Connect® Response™.)
To set the territory for one or more markers follow these steps:
| 1. | Select the markers for which you want to set the territory. |
| 2. | Click Actions and select Set Territory from the drop-down list. |
| 3. | Select a territory from the list. The territories are defined on the Territories screen. |
| 4. | Click Save. |
Setting the Secondary Category for One or More Markers
To set the secondary category for one or more markers follow these steps:
| 1. | Select the markers for which you want to set a secondary category. |
| 2. | Click Actions and select Edit Secondary Categories from the drop-down list. |
| 3. | Select the check boxes next to one or more categories. The categories are defined on the Marker Categories screen. If the list of categories is long, you can use the search field, above the list, to narrow down the list. If you have selected more than one marker and some of the markers, but not all, use a secondary category, the check box next to the category is partially selected  . You can repeatedly click on the check box to select the category for all markers . You can repeatedly click on the check box to select the category for all markers  , for none of the markers , for none of the markers  , or to go back to the partial selection . , or to go back to the partial selection . |
| 4. | Click Save. |
You can set several secondary categories, but only one primary category. Also use Edit Secondary Categories to remove secondary categories.
Setting Tags for One or More Markers
To set the tags for one or more markers follow these steps:
| 1. | Select the markers for which you want to set tags. |
| 2. | Click Actions and select Edit Tags from the drop-down list. |
| 3. | Select the check boxes next to one or more tags. The tags are defined on the Markers tab of the Tags screen. If the list of tags is long, you can use the search field to narrow down the list. If you have selected more than one marker and some of the markers, but not all, use a tag, the check box next to the category is partially selected . You can repeatedly click on the check box to select the category for all markers , for none of the markers , or to go back to the partial selection . |
| 4. | Click Save. |
You can also use Edit Tags to remove tags.
 Previous
 Next
Next Expand/Collapse
 Print
Print Share Page
 Training
 Knowledge